Many parents complain about the primary school registration in Singapore being a stressful process, but I beg to differ, probably I'm someone who plans ahead, and I don't give myself unnecessary stress for engaging in "mission impossible".
Here, I would like to walk you through the school selection and registration, I hope it will be helpful to you.
Step 1: Check the schools distance
Regardless of which stage of parenthood you are, be it "Kiasu" parent whose kid is not even born, or "super slack" parent who panick last minute, ask yourself this question:
"What are the schools around my house?"
Check the link here:
http://www.elite.com.sg/
P.s. you might want to check it before purchasing a property (yah, Kiasuism again, but it saves you from crying later).
Warning: Please do not buy a house next to elite school if you are not interested in joining the game, some parents didn't realise how popular the school next to their property, and this is the group of parents who will cry "I just want a school near to my place!!".
Basically, I do not encourage parents to register in a school further than 1 km from your place, unless you have a chauffeur (or you want to be one lol).
Step 2: Check the registration / balloting history
You can check the history here:
http://www.kiasuparents.com/kiasu/content/singapore-primary-1-registration-school-balloting-history?page=3
But you need to be a member to view the content.
The balloting history will give you an insight on how popular the schools around your place, which is helpful in your decision making.
Step 3: Decide on the available options
It depends on which stage are you in, do you have sufficient time to grasp the school of your choice?
Here, let me do up a decision tree for you:
A) School does not require balloting
Ok, you may continue to slack, but don't forget to check the MOM website during the registration period to avoid unexpected outcome.
B) School requires balloting
- Is your kid below 4 years old?
You still have the option to volunteer yourself for your kid to be qualified in 2B phase. If you're very firmed on the school of your choice, you may apply to be a Parent Volunteer (most school open the registration for PV 2 years before P1 registration); if you're undecided, Grassroots will be a better choice (GV's entitlement to 2B phase is for the schools in your constituency, thus you can still decide on which school to enrol your kid upon registration of P1) .
For my case, all three schools in my neighbourhood require balloting, i.e. Hougang Primary, Xinmin Primary, and Rosyth Primary. Rosyth is one of the top school in Singapore, while both Hougang and Xinmin are very popular neighbourhood school in our area, I could not decide which school shall I enrol her, and serving the residents seem to be in-line with my passion, thus I've chosen to be a GV rather than PV. Do note that new requirement starting 2015 requires GV to serve for 2 years before 2B phase certificate can be issued.
I've seen too many parents who are "bo chap" when their kids were in nursery, but changed their mind after seeing the classmates of their kids enroll into popular school. These are the parents caught unprepared, yet do not want to "lose out".
- Is your kid above 4 years old?
If you still want to try your luck and missed the boat of volunteering your service, you can only rely on the strategies which I will reveal to you next........ pay attention!
Step 4: P1 registration strategies, be prepared!
If you belong to the A group, just make sure you check the MOM registration phase before its closing date.
If you belong to the B group, do plan ahead and be decisive:
1) Enrol on the last day of registration, not the first day
2) Check the registration status on the last day of registration, 2 hours before closing time
3) Make your decision decisively, shall I join the ballot? Shall I pull out (from first choice) to another school?
Here I give you a few real life cases:
1) Last year, 2 grassroots volunteers of my constituency registered in Rosyth, on the last day of registration, 1 grassroots volunteer found out that balloting is required even for citizen staying within 1 km of the school, he decided to withdraw his kid and put him in Hougang, which only required balloting in 2C phase. This volunteer secured a slot for his kid in Hougang in 2B. The other grassroot volunteer, decided to try her (or her kid's) luck, which the kid didn't get a place in Rosyth from the balloting, she disappointedly register her kid in Hougang again in 2C phase, which a balloting is required. She and her kid went through 2 rounds of heart trembling balloting.
2) A friend of mine, initially deciding between 2 schools, School A and School B. School A was very popular neighbourhood school but required balloting in phase 2C for non citizen while School B did not require balloting. She was hesitating to make a decision between the 2 choices. School A and School B are both good school in her area, but she decided to try her luck at School A. There were around 18 PR turned up for the balloting for 2 vacancies, she was not one of the lucky two. Her child then need to go through phase 2C Supplementary to get a place in P1. For this phase, as most Singaporean who fail to get a place in phase 2C would then register for their next best option, which would be school like School B, Singaporean will have advantage over the non citizen, which means my friend will need to ballot again if she were to register her kid at School B. She then decided to register her kid at School C instead. Using this example, if she were decisive at phase 2C, her kid would be able to register in School B without balloting.
I hope the above write up is useful to you, no matter which school is your kid attending, remember the MOE slogan, every school is a good school! :)
Friday, November 27, 2015
Thursday, October 9, 2014
A to Z crafts - R for Rabbit
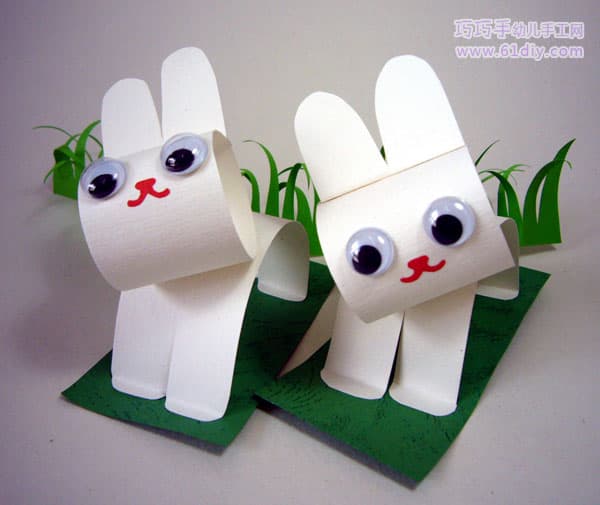
Rabbit is a favourite animal to many children, probably because it is too cute to resist.
I wanted to do a craft that's cute and pretty, thus I had chosen this one for my letter R lesson.
The craft is adapted from a Chinese website (refer to the link on the picture), the picture below is pretty clear on how you should go about doing it. Basically you only need to cut 2 pieces of white paper into the shape of its legs and head, roll it and paste it together.
See their happy faces with their rabbits. By the way I do see difference in boy and girl in their works, the boy's rabbit looked more like a dirty cat, ha!
I wanted to do a craft that's cute and pretty, thus I had chosen this one for my letter R lesson.
The craft is adapted from a Chinese website (refer to the link on the picture), the picture below is pretty clear on how you should go about doing it. Basically you only need to cut 2 pieces of white paper into the shape of its legs and head, roll it and paste it together.
See their happy faces with their rabbits. By the way I do see difference in boy and girl in their works, the boy's rabbit looked more like a dirty cat, ha!
This craft work is used in conjunction to my Fun Classes, you may refer here for details of my Fun Classes.
List of my A to Z crafts other than those used in the Fun Classes:
1) A for Apple Tree
2) B for Bear
3) C for Caterpillar
List of my A to Z crafts other than those used in the Fun Classes:
1) A for Apple Tree
2) B for Bear
3) C for Caterpillar
10) J for Jelly fish
11) K for King
12) L for Lion
14) N for Necklace
15) O for Octopus
16) P for Pig
17) Q for Quail
This section will be updated continuously as and when I have new craft idea for my kids. Do like my Facebook page "learn the fun way" to get more updates.
Wednesday, October 8, 2014
A to Z Crafts - Q for Quail
We did a craft on Quail, which I printed the drawing from a website here.
Print the drawing and let the kid colour it. After done just cut it out and paste it on a paper.
I've also printed a worksheet on Q and let him practise writing it which I forgotten the source, but you may google "letter Q worksheet" and there are plenty of worksheets available.
Print the drawing and let the kid colour it. After done just cut it out and paste it on a paper.
I've also printed a worksheet on Q and let him practise writing it which I forgotten the source, but you may google "letter Q worksheet" and there are plenty of worksheets available.
This craft work is used in conjunction to my Fun Classes, you may refer here for details of my Fun Classes.
List of my A to Z crafts other than those used in the Fun Classes:
1) A for Apple Tree
2) B for Bear
3) C for Caterpillar
List of my A to Z crafts other than those used in the Fun Classes:
1) A for Apple Tree
2) B for Bear
3) C for Caterpillar
10) J for Jelly fish
11) K for King
12) L for Lion
14) N for Necklace
15) O for Octopus
16) P for Pig
This section will be updated continuously as and when I have new craft idea for my kids. Do like my Facebook page "learn the fun way" to get more updates.
A to Z Crafts - P for Piggy
We were not doing so much on craft for this lesson, rather we were doing a role play on the story of "Three Little Piggy".
Do a pig nose like the one in the picture above, tie it with rubber bands so that the kid can wear it on the ears.
The story of "Three Little Piggy" can be found here.
I'm sure your kids will enjoy this lesson with the role play. Do enforce letter P at the start and the end of the lesson.
Do a pig nose like the one in the picture above, tie it with rubber bands so that the kid can wear it on the ears.
The story of "Three Little Piggy" can be found here.
I'm sure your kids will enjoy this lesson with the role play. Do enforce letter P at the start and the end of the lesson.
This craft work is used in conjunction to my Fun Classes, you may refer here for details of my Fun Classes.
List of my A to Z crafts other than those used in the Fun Classes:
1) A for Apple Tree
2) B for Bear
3) C for Caterpillar
List of my A to Z crafts other than those used in the Fun Classes:
1) A for Apple Tree
2) B for Bear
3) C for Caterpillar
10) J for Jelly fish
11) K for King
12) L for Lion
14) N for Necklace
15) O for Octopus
This section will be updated continuously as and when I have new craft idea for my kids. Do like my Facebook page "learn the fun way" to get more updates.
Wednesday, September 24, 2014
Games on learning Chinese with your kid
Found the following games from Internet on how you can teach your kid Chinese in a fun and interactive way, really useful and it works for my kids:
1.认字
每人分有一些字卡,大家轮流出一张字卡,其他人谁先说对谁把字卡拿走,最后手中字卡多者为胜。
2.指字
老师出三到五张字卡,让学生们指其中一个字,谁先指到那个字,谁就把字卡拿走,最后手中字卡多者为胜。由于学生不知道我要让他们指哪个字,所以每个人的注意力都高度集中。学生们也可以轮流当老师。这个游戏是他们最喜欢的。
3.摸字
在口袋或盒子里放上卡片,学生轮流摸出一张字卡,念对了,把字卡拿走;念错了,把字卡放回。谁手中的字卡多,谁就是胜者。
4.谁不在
把几张字卡放在桌子上或黑板槽里,让学生看几秒钟后闭上眼睛,老师拿走其中一张字卡,把剩下的字卡重新排列。然后让学生睁开眼睛,说出“谁”不在了(即哪张字卡被拿走了),先说出来者为胜。这个游戏可逐渐变难,放更多张字卡,也可一次拿走2-3张。
5.好记性
把几张字卡同时放在桌子上或黑板槽里,给学生十几秒钟的时间记住这些字。时间到,把字卡全部拿走。学生凭记忆说出字卡上的字。说出字多者为胜。
6. 组词
每人轮流出一张字卡,其他人组词,谁先组出词来,或者谁组的词多,谁把这张字卡拿走。最后手中字卡多者为胜。
7. 读句子
每人轮流出一张字卡,句子那面朝上(字卡一面是字,另一面是用这个字组成的句子),其他人读句子,谁先正确读出句子来,谁把这张字卡拿走。
8. 说句子
每人轮流出一张字卡,字的那面朝上,其他人说出一句包括这个字的句子,谁先说出来,谁把这张字卡拿走。此游戏可逐渐变难,可一次放3-5张字卡,学生们把这些字连起来说一句话。
1.认字
每人分有一些字卡,大家轮流出一张字卡,其他人谁先说对谁把字卡拿走,最后手中字卡多者为胜。
2.指字
老师出三到五张字卡,让学生们指其中一个字,谁先指到那个字,谁就把字卡拿走,最后手中字卡多者为胜。由于学生不知道我要让他们指哪个字,所以每个人的注意力都高度集中。学生们也可以轮流当老师。这个游戏是他们最喜欢的。
3.摸字
在口袋或盒子里放上卡片,学生轮流摸出一张字卡,念对了,把字卡拿走;念错了,把字卡放回。谁手中的字卡多,谁就是胜者。
4.谁不在
把几张字卡放在桌子上或黑板槽里,让学生看几秒钟后闭上眼睛,老师拿走其中一张字卡,把剩下的字卡重新排列。然后让学生睁开眼睛,说出“谁”不在了(即哪张字卡被拿走了),先说出来者为胜。这个游戏可逐渐变难,放更多张字卡,也可一次拿走2-3张。
5.好记性
把几张字卡同时放在桌子上或黑板槽里,给学生十几秒钟的时间记住这些字。时间到,把字卡全部拿走。学生凭记忆说出字卡上的字。说出字多者为胜。
6. 组词
每人轮流出一张字卡,其他人组词,谁先组出词来,或者谁组的词多,谁把这张字卡拿走。最后手中字卡多者为胜。
7. 读句子
每人轮流出一张字卡,句子那面朝上(字卡一面是字,另一面是用这个字组成的句子),其他人读句子,谁先正确读出句子来,谁把这张字卡拿走。
8. 说句子
每人轮流出一张字卡,字的那面朝上,其他人说出一句包括这个字的句子,谁先说出来,谁把这张字卡拿走。此游戏可逐渐变难,可一次放3-5张字卡,学生们把这些字连起来说一句话。
Friday, July 4, 2014
A to Z Crafts - O for Octopus
We did a session on Jellyfish for our letter J lesson, so while choosing the craft for this "O for octopus" lesson, I hope the craft does not end up similar to the one we did on Jellyfish.
O for Octopus
What you'll need:
1) A toilet roll
2) A button
3) A pair of scissors
4) Marker pen
Instruction:
1) Cut the bottom of the toilet roll as the arms of octopus, as shown in the picture below, it should be 8 arms only.
2) Use the marker pen to draw the eyes.
3) Paste the button at the centre as the nose
4) You may colour the toilet roll if you want to.
Little boy playing with his new friend, Mr Octopus.....
O for Octopus
What you'll need:
1) A toilet roll
2) A button
3) A pair of scissors
4) Marker pen
Instruction:
1) Cut the bottom of the toilet roll as the arms of octopus, as shown in the picture below, it should be 8 arms only.
2) Use the marker pen to draw the eyes.
3) Paste the button at the centre as the nose
4) You may colour the toilet roll if you want to.
Little boy playing with his new friend, Mr Octopus.....
This craft work is used in conjunction to my Fun Classes, you may refer here for details of my Fun Classes.
List of my A to Z crafts other than those used in the Fun Classes:
1) A for Apple Tree
2) B for Bear
3) C for Caterpillar
List of my A to Z crafts other than those used in the Fun Classes:
1) A for Apple Tree
2) B for Bear
3) C for Caterpillar
10) J for Jelly fish
11) K for King
12) L for Lion
14) N for Necklace
This section will be updated continuously as and when I have new craft idea for my kids. Do like my Facebook page "learn the fun way" to get more updates.
Thursday, July 3, 2014
A to Z Crafts - N for Necklace
I've done this craft with my girl before in my fun class, which I find it quite fun and easy to do, thus I did it again with my son. Basically, you just need a string and some macaroni.
N for Necklace
What you'll need:
1) A string (preferably elastic)
2) Macaroni
3) Water colour (optional)
Instruction:
1) Paint the macaroni (if you prefer it to be colourful)
2) Let the kid thread the macaroni with a string
3) Tie it with a knot
The necklace done:
The kids enjoyed playing with the macaroni.
N for Necklace
What you'll need:
1) A string (preferably elastic)
2) Macaroni
3) Water colour (optional)
Instruction:
1) Paint the macaroni (if you prefer it to be colourful)
2) Let the kid thread the macaroni with a string
3) Tie it with a knot
The kids enjoyed playing with the macaroni.
I did not colour the macaroni, because those macaroni were our lunch the next day! Don't worry, I did wash the macaroni before cooking.....lol!
This craft work is used in conjunction to my Fun Classes, you may refer here for details of my Fun Classes.
List of my A to Z crafts other than those used in the Fun Classes:
1) A for Apple Tree
2) B for Bear
3) C for Caterpillar
List of my A to Z crafts other than those used in the Fun Classes:
1) A for Apple Tree
2) B for Bear
3) C for Caterpillar
10) J for Jelly fish
11) K for King
12) L for Lion
This section will be updated continuously as and when I have new craft idea for my kids. Do like my Facebook page "learn the fun way" to get more updates.
Wednesday, July 2, 2014
A to Z Crafts - M for Mickey Mouse!
I wanted to do a craft of a cartoon character that they are familiar with, definitely not going to do anything related to 'monkey' since they've done it so many times already. I came across this very cute Mickey Mouse made from toilet roll, which is easy to do, and easy to associate with my letter M lesson.
M for Mickey Mouse
What you'll need:
1) Toilet roll
2) Black, white and red paper
3) Button
4) Water colour
5) Glue
Instruction:
1) Paint the toilet roll with black water colour, leave aside to dry.
2) Cut the shape of the head (with ears) out from the black paper
3) Cut the shape of the face out from the white paper
4) Paste the cut outs to the toilet roll (after dried)
5) Paste the red paper (cover half of the toilet roll) to the toilet roll, do your measurement.
6) Paste the button.
7) Draw the eyes, nose and mouth.
Done!
This craft work is used in conjunction to my Fun Classes, you may refer here for details of my Fun Classes.
List of my A to Z crafts other than those used in the Fun Classes:
1) A for Apple Tree
2) B for Bear
3) C for Caterpillar
M for Mickey Mouse
What you'll need:
1) Toilet roll
2) Black, white and red paper
3) Button
4) Water colour
5) Glue
Instruction:
1) Paint the toilet roll with black water colour, leave aside to dry.
2) Cut the shape of the head (with ears) out from the black paper
3) Cut the shape of the face out from the white paper
4) Paste the cut outs to the toilet roll (after dried)
5) Paste the red paper (cover half of the toilet roll) to the toilet roll, do your measurement.
6) Paste the button.
7) Draw the eyes, nose and mouth.
Done!
This craft work is used in conjunction to my Fun Classes, you may refer here for details of my Fun Classes.
List of my A to Z crafts other than those used in the Fun Classes:
1) A for Apple Tree
2) B for Bear
3) C for Caterpillar
10) J for Jelly fish
11) K for King
12) L for Lion
This section will be updated continuously as and when I have new craft idea for my kids. Do like my Facebook page "learn the fun way" to get more updates.
Friday, April 25, 2014
A to Z Crafts - L for Lion
I had been thinking what to do for this lesson L, and I found this cute lion craft from the web made using toilet rolls (yes, I've lots of toilet rolls!). It was also easy for the kid to associate letter L to Lion, and also easier to prompt him in spelling the word.
L for Lion
What you'll need:
1) 1 piece of paper plate
2) Cut out of the ears and tail from white paper
3) Cut out of the wiskers, eyes, nose, hair on the tail from black paper
4) 1 toilet roll
5) water colours
Instruction:
1) Paint the toilet roll, paper plate and the white paper cut outs and leave it to dry.
2) Paste the cut outs to the paper plate as shown in the picture.
Kids like painting mostly. See my two littles were so focusing on their work.
This the finished product, aren't they cute?
This is the glue I shared on my facebook, it can really hold the artwork together.
This craft work is used in conjunction to my Fun Classes, you may referhere for details of my Fun Classes.
List of my A to Z crafts other than those used in the Fun Classes:
1) A for Apple Tree
2) B for Bear
3) C for Caterpillar
What you'll need:

2) Cut out of the ears and tail from white paper
3) Cut out of the wiskers, eyes, nose, hair on the tail from black paper
4) 1 toilet roll
5) water colours
6) Glue
Instruction:
1) Paint the toilet roll, paper plate and the white paper cut outs and leave it to dry.
2) Paste the cut outs to the paper plate as shown in the picture.
Kids like painting mostly. See my two littles were so focusing on their work.
This the finished product, aren't they cute?
This is the glue I shared on my facebook, it can really hold the artwork together.
This craft work is used in conjunction to my Fun Classes, you may referhere for details of my Fun Classes.
List of my A to Z crafts other than those used in the Fun Classes:
1) A for Apple Tree
2) B for Bear
3) C for Caterpillar
10) J for Jelly fish
11) K for King
This section will be updated continuously as and when I have new craft idea for my kids. Do like my Facebook page "learn the fun way" to get more updates.
Thursday, April 10, 2014
A to Z Crafts - K for King
What is the most important item to a king? That would of course be the crown right?!
In this K for King lesson, we were making a crown. The crown were used in the role play for the lesson on letter K.
K for King
What you'll need:
1) 1 piece of card
2) 1 rubber bands
3) Crayon or colour pencils
4) A pair of scissors
Instruction:
1)Cut the shape of the crown from the card, like the one you see in the picture below. Draw the ornaments on the cut out.
2) Staple a rubber bands at the two sides of the card to join the crown up.
Little king playing with his crown.
This craft work is used in conjunction to my Fun Classes, you may refer here for details of my Fun Classes.
List of my A to Z crafts other than those used in the Fun Classes:
1) A for Apple Tree
2) B for Bear
This section will be updated continuously as and when I have new craft idea for my kids. Do like my Facebook page "learn the fun way" to get more updates.
In this K for King lesson, we were making a crown. The crown were used in the role play for the lesson on letter K.
K for King
What you'll need:
1) 1 piece of card
2) 1 rubber bands
3) Crayon or colour pencils
4) A pair of scissors
Instruction:
1)Cut the shape of the crown from the card, like the one you see in the picture below. Draw the ornaments on the cut out.
2) Staple a rubber bands at the two sides of the card to join the crown up.
Little king playing with his crown.
This craft work is used in conjunction to my Fun Classes, you may refer here for details of my Fun Classes.
List of my A to Z crafts other than those used in the Fun Classes:
1) A for Apple Tree
2) B for Bear
10) J for Jelly fish
This section will be updated continuously as and when I have new craft idea for my kids. Do like my Facebook page "learn the fun way" to get more updates.
Friday, February 7, 2014
A to Z Crafts - J for Jellyfish
In this lesson, we are making a Jellyfish from a plastic container.
The finished product will look something like this, isn't it cute?
J for Jellyfish
What you'll need:
1) 1 piece of plastic container (those you get when you buy back the food from hawker centre, if you really can't find it, you may use a transparent plastic cup)
2) 1 small piece of white paper for the eyes
3) Red and blue (or any other colours) colour transparent gift paper, I got mine from Daiso at $2 for 3 big piece in a pack.
4) Marker pen
5) A pair of scissors
6) Glue
Instruction:
1) Cut the red transparent paper into small pieces, about 1x1 inches.
2) Cut the blue transparent paper into strips as the tentacles of the jellyfish.
3) Put glue inside the container
4) Paste the red transparent paper cut in number (1) above inside the container
5) Paste the blue transparent paper cut in number (2) above at the side of the container, as the tentacles
6) Cut 2 ovals and draw the black eyes on it, paste it on the container
7) It is done. You may hang it up, it looked great with a light bulb hang inside the container.
This craft work is used in conjunction to my Fun Classes, you may refer here for details of my Fun Classes.
List of my A to Z crafts other than those used in the Fun Classes:
1) A for Apple Tree
2) B for Bear
3) C for Caterpillar
This section will be updated continuously as and when I have new craft idea for my kids. Do like my Facebook page "learn the fun way" to get more updates.
The finished product will look something like this, isn't it cute?
J for Jellyfish
What you'll need:
1) 1 piece of plastic container (those you get when you buy back the food from hawker centre, if you really can't find it, you may use a transparent plastic cup)
2) 1 small piece of white paper for the eyes
3) Red and blue (or any other colours) colour transparent gift paper, I got mine from Daiso at $2 for 3 big piece in a pack.
4) Marker pen
5) A pair of scissors
6) Glue
Instruction:
1) Cut the red transparent paper into small pieces, about 1x1 inches.
2) Cut the blue transparent paper into strips as the tentacles of the jellyfish.
3) Put glue inside the container
4) Paste the red transparent paper cut in number (1) above inside the container
5) Paste the blue transparent paper cut in number (2) above at the side of the container, as the tentacles
6) Cut 2 ovals and draw the black eyes on it, paste it on the container
7) It is done. You may hang it up, it looked great with a light bulb hang inside the container.
This craft work is used in conjunction to my Fun Classes, you may refer here for details of my Fun Classes.
List of my A to Z crafts other than those used in the Fun Classes:
1) A for Apple Tree
2) B for Bear
3) C for Caterpillar
This section will be updated continuously as and when I have new craft idea for my kids. Do like my Facebook page "learn the fun way" to get more updates.
Wednesday, October 16, 2013
A to Z crafts - I for Insect! Making Bee from Egg Shell
This is a very cute craft, I found the picture of this little cute bee and decided to make it on our "I for insect" lesson.
I for Insect
What you'll need:
1) 1 piece of egg shell (prepare more if you are doing a few types of insect)
2) 1 small piece of white paper for the wings
3) 1 small piece of black paper for the stripes
4) Marker pen
5) A pair of scissors
6) Water colours
7) Glue
Instruction:
1) Colour the egg shell with yellow and leave it to dry
2) Cut the white paper in round shape and fold it for the wings
3) Cut the black colour stripes, you'll need 2 stripes to be pasted on the egg shell
4) Draw the eyes, mouth on the egg shell after the colour is dried
5) Paste the wings and stripes on the egg shell
This craft work is used in conjunction to my Fun Classes, you may refer here for details of my Fun Classes.
List of my A to Z crafts other than those used in the Fun Classes:
1) A for Apple Tree
2) B for Bear
This section will be updated continuously as and when I have new crafts idea for my kids. Do like my Facebook page "learn the fun way" to get more updates.
I for Insect
What you'll need:
1) 1 piece of egg shell (prepare more if you are doing a few types of insect)
2) 1 small piece of white paper for the wings
3) 1 small piece of black paper for the stripes
4) Marker pen
5) A pair of scissors
6) Water colours
7) Glue
Instruction:
1) Colour the egg shell with yellow and leave it to dry
2) Cut the white paper in round shape and fold it for the wings
3) Cut the black colour stripes, you'll need 2 stripes to be pasted on the egg shell
4) Draw the eyes, mouth on the egg shell after the colour is dried
5) Paste the wings and stripes on the egg shell
This craft work is used in conjunction to my Fun Classes, you may refer here for details of my Fun Classes.
List of my A to Z crafts other than those used in the Fun Classes:
1) A for Apple Tree
2) B for Bear
This section will be updated continuously as and when I have new crafts idea for my kids. Do like my Facebook page "learn the fun way" to get more updates.
Subscribe to:
Posts (Atom)
Learn By The Fun Way!
Learning can be fun! Learning can be easy!
This blog is about a mother trying to bring joys and happiness to her kids while accompanying them in their learning journey......
You may read more here.
You're welcome to have healthy discussion here, do post your comments on my articles and share with me your views, leave me your contact or blog address!
If you like my fun classes, please like my Facebook page of "Learn The Fun Way"!
This blog is about a mother trying to bring joys and happiness to her kids while accompanying them in their learning journey......
You may read more here.
You're welcome to have healthy discussion here, do post your comments on my articles and share with me your views, leave me your contact or blog address!
If you like my fun classes, please like my Facebook page of "Learn The Fun Way"!